- Create a new artwork
- Add or edit the calligraphy text
- Change the calligraphy position
- Change position of segments
- Change the shape of the characters
- Applying elongations
- Putting diacritics and decorative symbols
- Cutting or The glyph disconnection option
- Upper toolbar
- Saving and downloading
1. Create a new artwork
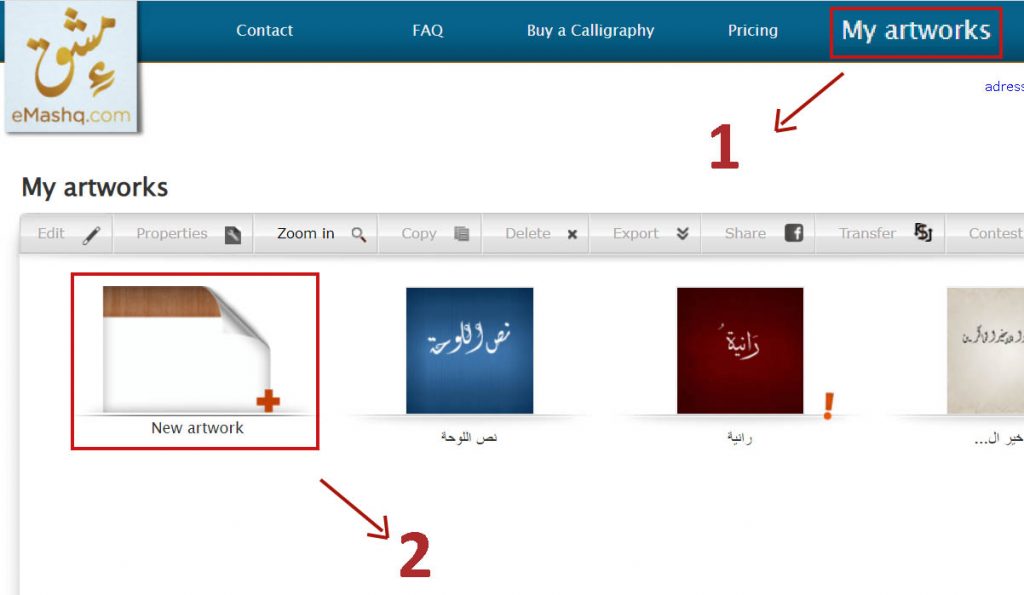
In the home page, click on “My artworks” to go to the creation space (1),
Once on this interface, go to “New artwork” (2)
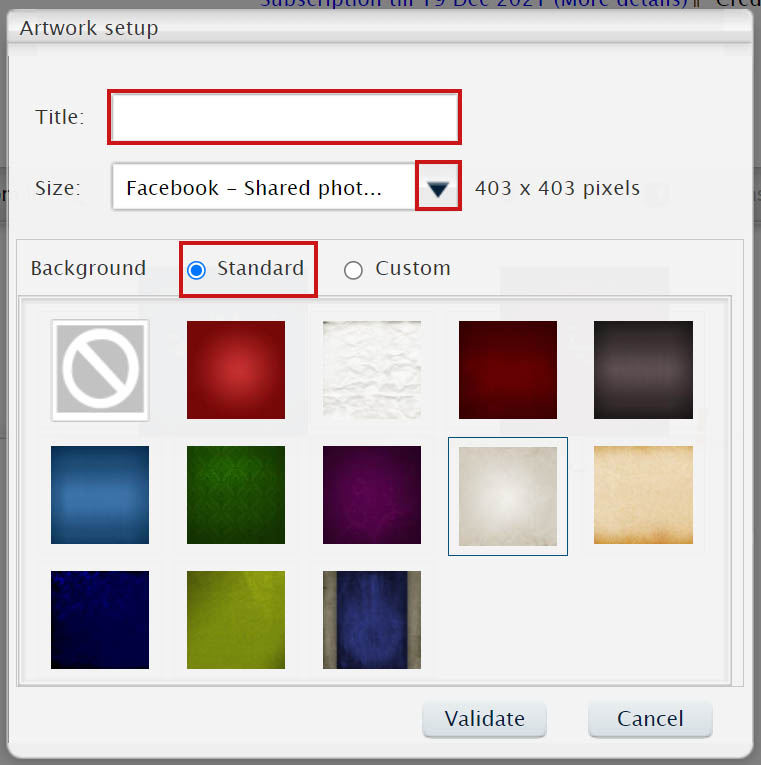
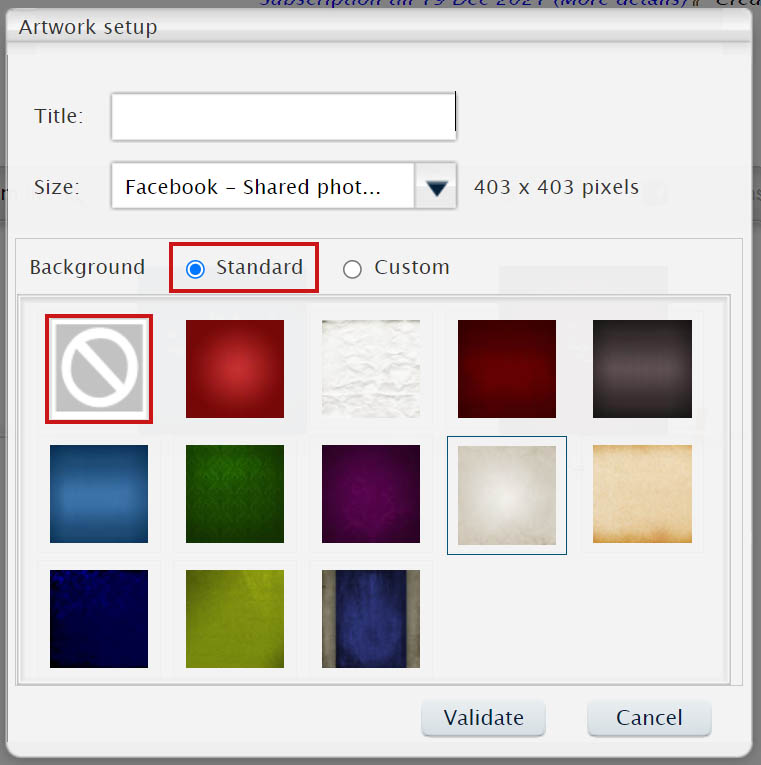
Hereafter, you need to define your file’s title, size, and background.
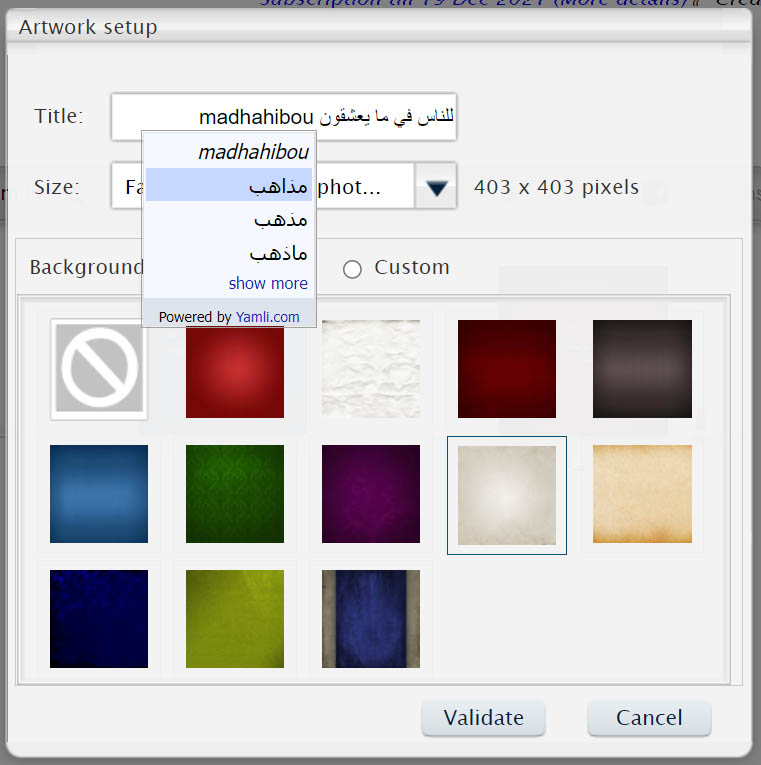
If you want to name your file in Arabic and you’ve not an Arabic keypad, don’t panic! just write with roman letters and you’ll get your text proposed in Arabic letters.
This cool service is powered by Yamli.com
Use your own document settings, or choose from a series of predefined document settings.If you need to work on a clear document without any background, you must make your choice now, click on ⦸
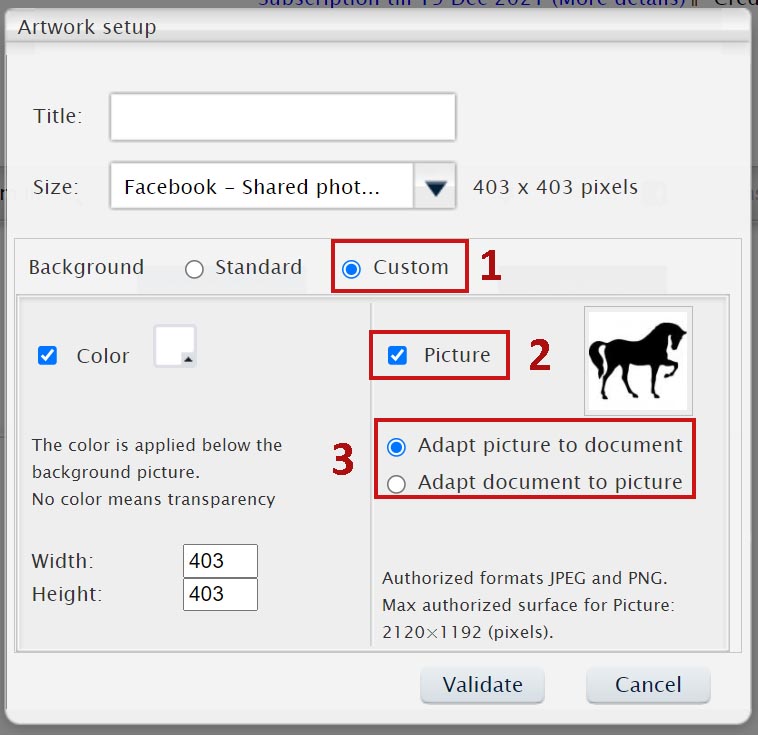
If you need to adjust your calligraphy work to a specific shape (horse, heart, eye…), eventually, to put this shape as a removable background, then follow these steps: Click on “custom”
Choose “picture”, and upload your sketch, you can even adapt your picture to the document or conversely.
2. Add or edit the calligraphy text
When opening a new artwork, by default, the Text tool is selected and a new text area is proposed with the title text of the artwork.
You can confirm or edit that text before applying.
To edit an existing text, select that tool and click on the calligraphy area. You will be prompted to edit the calligraphy text.

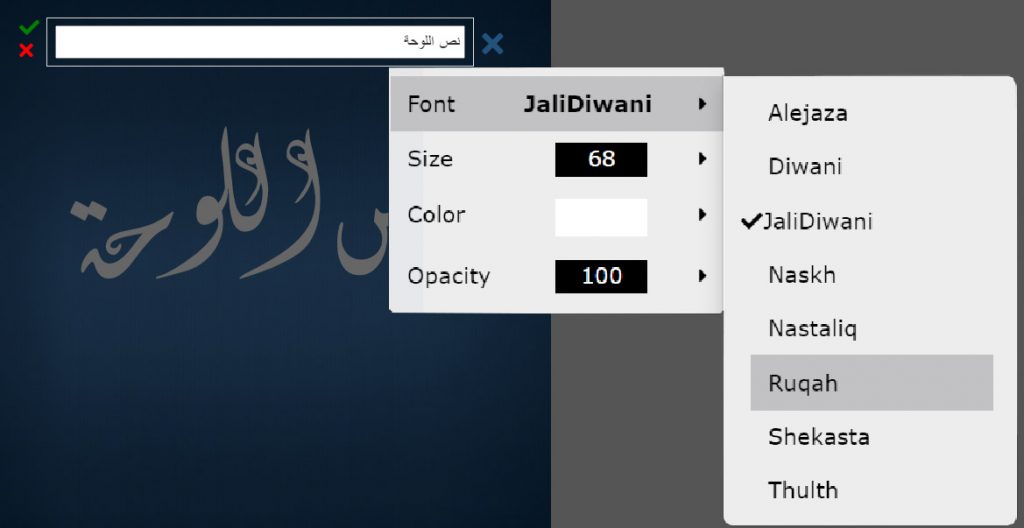
- The text tool options
You can edit: the Font (calligraphy style), the Size, the Color and the Opacity of the calligraphy.
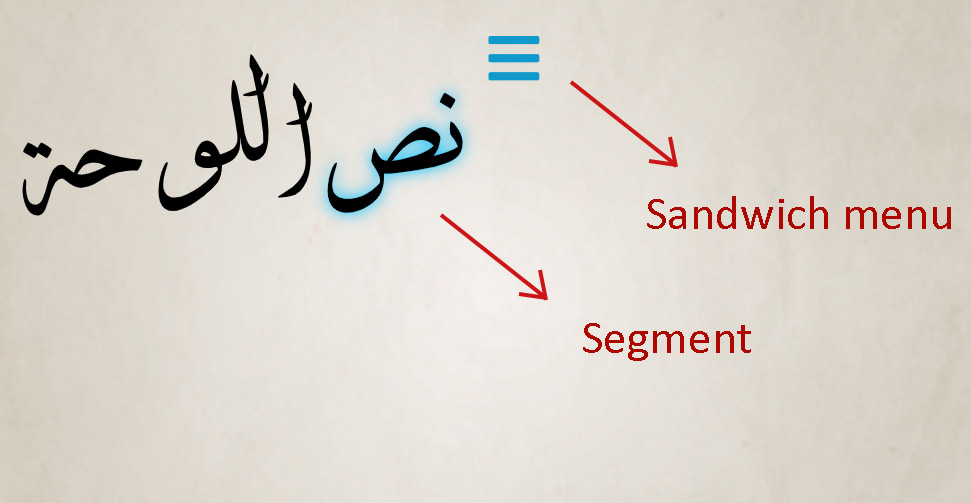
Click on the blue sandwich symbol beside the text area to edit the text options.
If you’re on a free registration you can only use one font, the one allowed for that day.
3. Change the calligraphy position
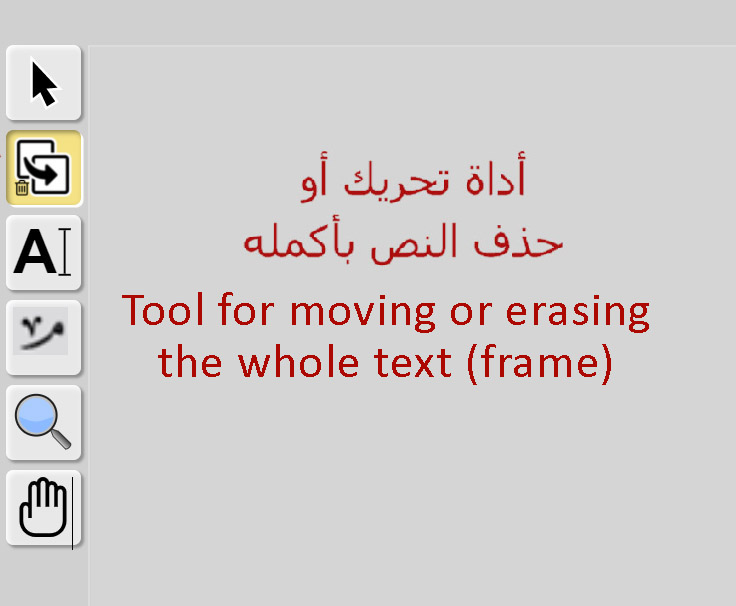
We define a Frame as the whole sentence wrote in an unique calligraphy style.
Select the Frame tool, then click on the chosen frame to move it or to erase it.
To change the position of some parts (segments) of the calligraphy, see how to Change position of segments.
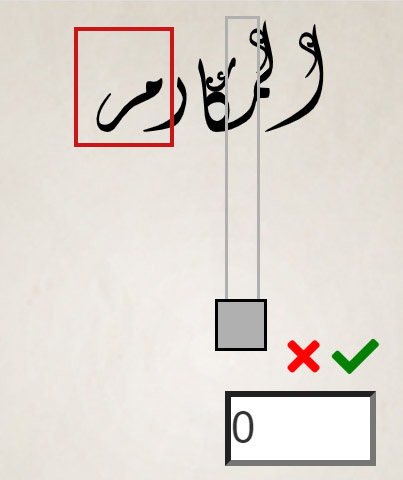
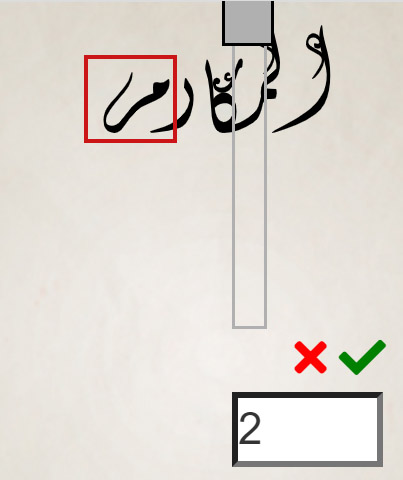
4. Change position of segments
A segment is any non attached part of a word. As instance كريم is composed by 2 principal segments: كر and يم. The two points of the Ya (ي) can also be edited as a segment but we call it here: Diacritic.
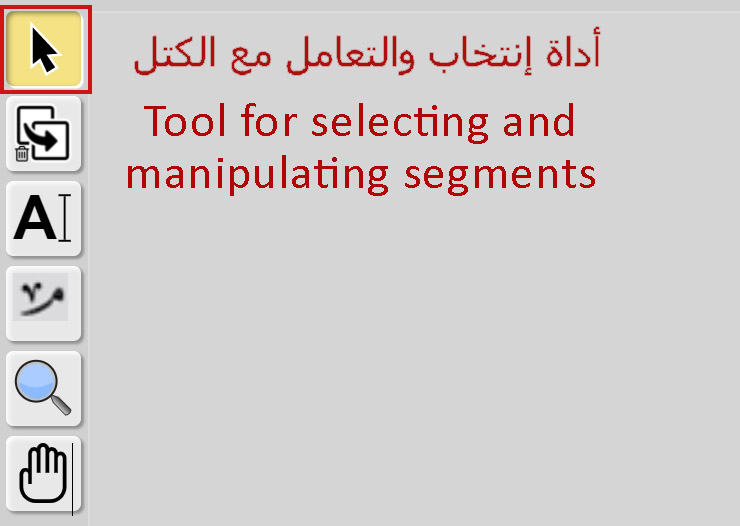
The selector tool allows you to select a segment and to change its position by a drag and drop mouvement of the pointer.
One click on a letter (character) select the segment.
Two clicks select the word with all its segments.
Three clicks select the whole phrase you put in the frame.
Notice that when you choose the whole phrase and you move it, the decorative symboles added from their panel don’t follow the move.
To move text and added symbols, move all the frame.
You can also use the direction keys on the keyboard to adjust the position of the segment or of a diacritic.
5. Change the shape of the characters
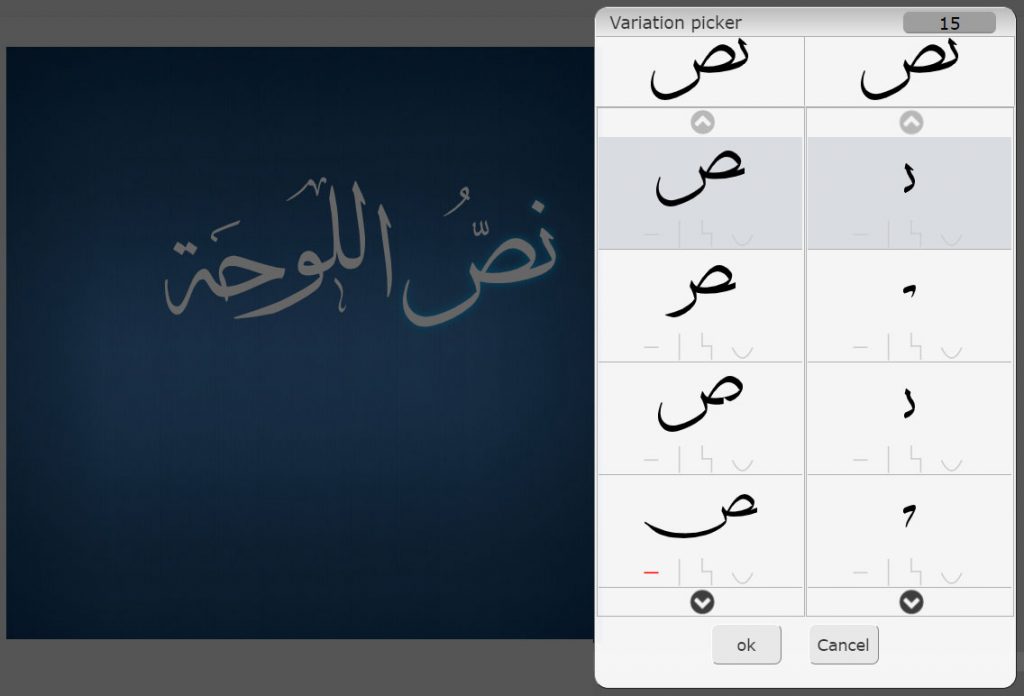
First select the chosen segment
Then click on the sandwich menu beside the selected segment
And click on Variants
6. Applying elongations
- Vertical elongation
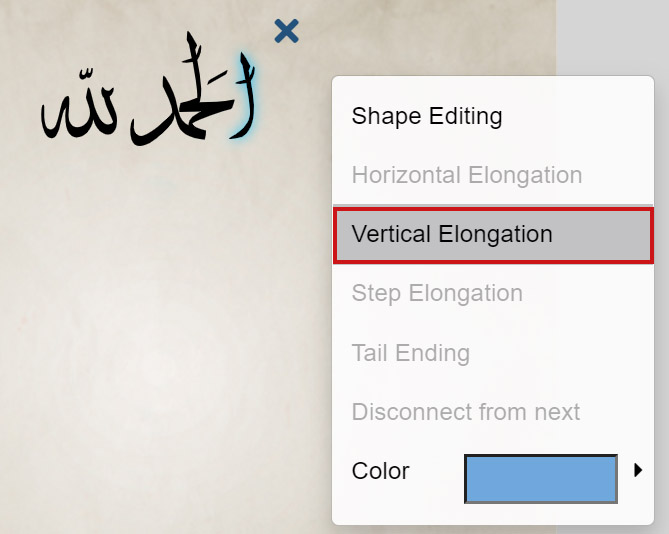
Select the glyph on which we want to ask/apply for an elongation.
If an elongation is allowed, select it from the context menu (sandwich menu appearing next to the selected segment).
Once you click on “vertical elongation”, a scrollbar appears next to it.
Now you move the button up to elongate the glyph to the requested level.
Sometimes, you can move the button down to reduce the glyph to a requested level.
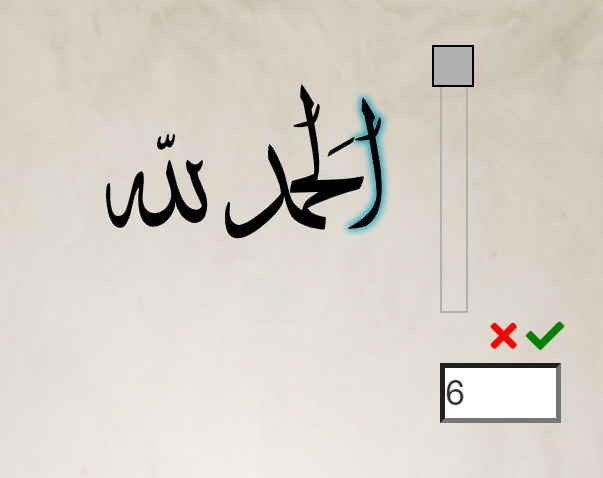
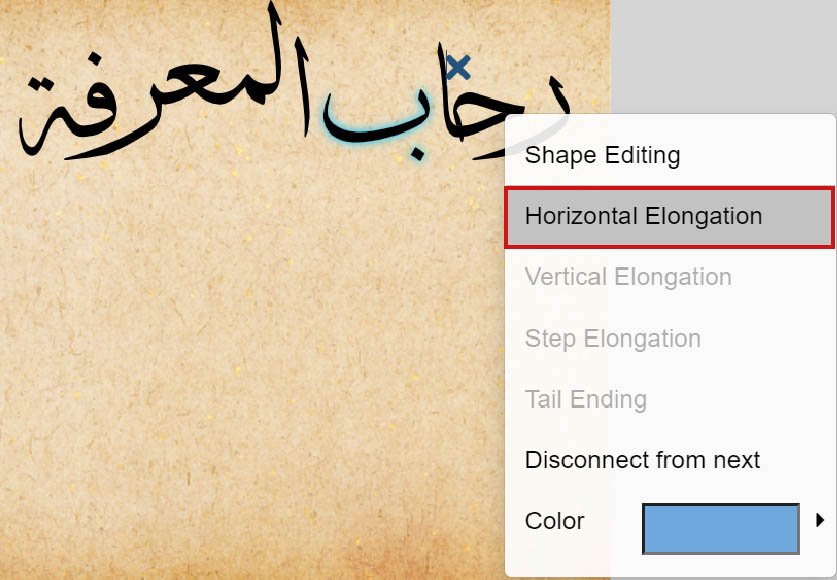
- Horizontal elongation
Select the glyph on which we want to ask/apply for an horizontal elongation.
If an elongation is allowed, select it from the context menu (sandwich menu appearing next to the selected segment).
Once you click on “vertical elongation”, a scrollbar appears next to it.
Now you move the button to the right to elongate the glyph to the requested level.
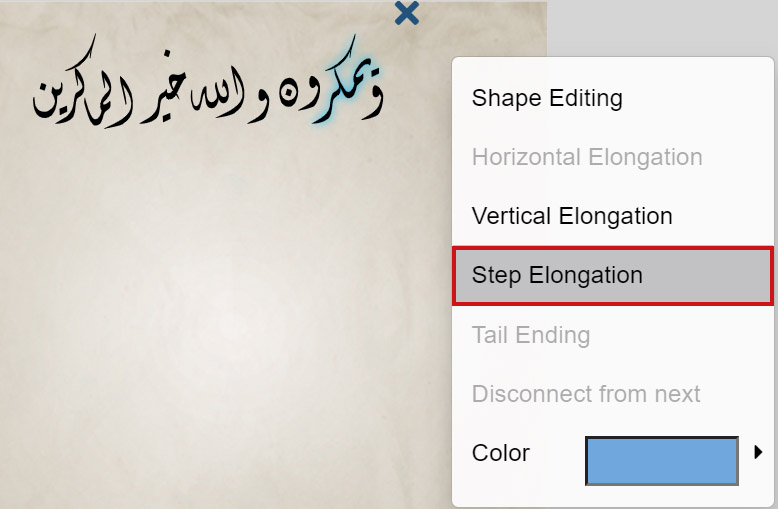
- Step elongation
Select the glyph on which we want to ask/apply for a step elongation (it works in the fonts: Diwani, Jalidiwani and Ruquah with the letter “ك” in the beginning or the middle of the word, and the letter Alif “ا” disconnected, Just in Diwani font).
If a step elongation is allowed, select it from the context menu (sandwich menu appearing next to the selected segment).
Once you click on “step elongation”, a scrollbar appears next to it.
Now you move the button to the right for a unique calligraphic design.
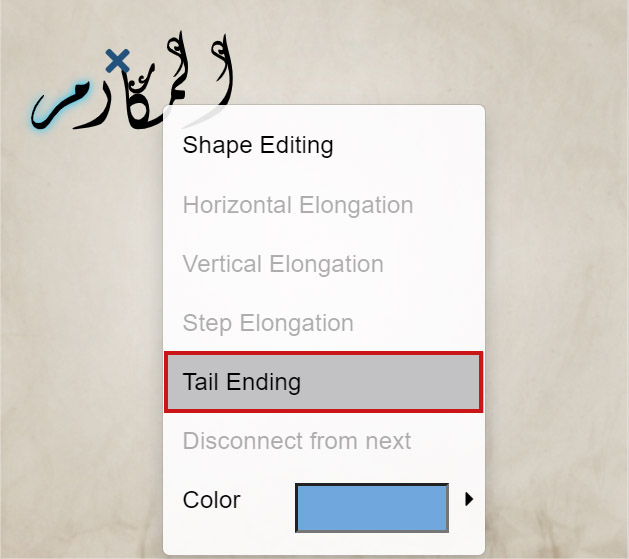
- Tail ending
Select the glyph on which we want to ask/apply for a tail ending (Usually it must be at the end of the word, but some separated letters can be applied for tail ending, such as Alif “ا” in the fonts Diwani and JaliDiwani, and “و” in the fonts Aljazeera, Diwani, and Shekasta ).
If a tail ending is allowed, select it from the context menu (sandwich menu appearing next to the selected segment).
Once you click on “tail ending”, a scrollbar appears next to it.
Now you move the button up to embellish your word’s ending.
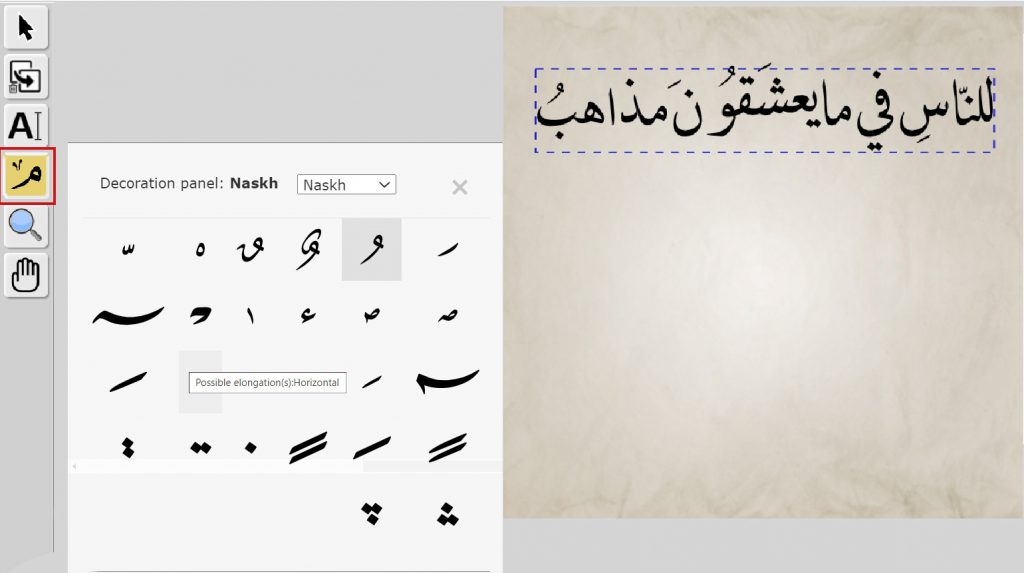
7. Putting diacritics and decorative symbols:
To add diacritics and decorative symbols to your text, you need to click on the fourth button on the toolbar, then you choose a decorative symbol, first, you click on it, second you click where you want to put it.
And here it is!
Once you are done, don’t forget to close the window of mark tools, and take another tool, to avoid putting marks everywhere!
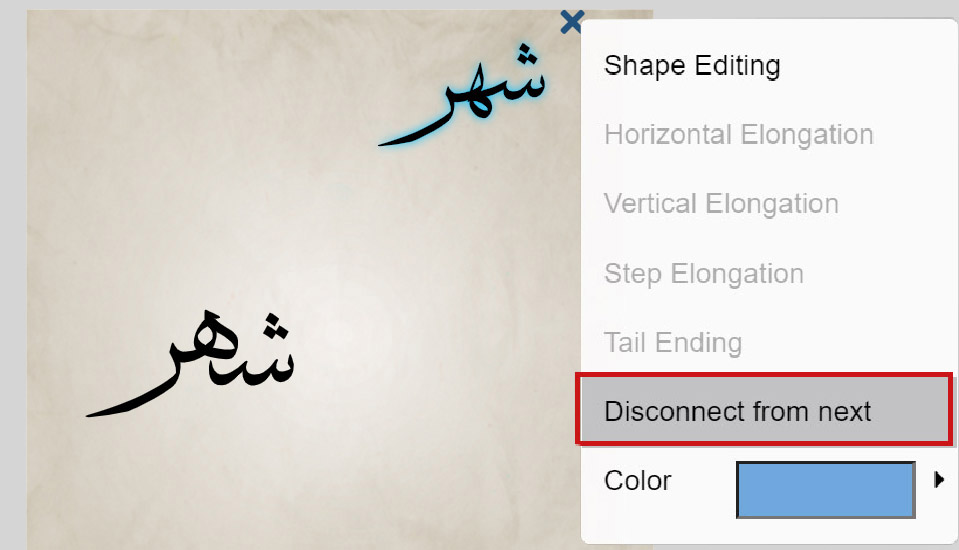
8. Cutting or The glyph disconnection option
Glyphs in Thulth font and Naskh font can be disconnected (or cut).
Select the concerning glyph.
Click on the sandwich menu.
Choose the option “Disconnect from next “.
Once it’s disconnected, adjust the position of the disconnected glyph, and enjoy your unusual design!
9. Upper toolbar
- Undo tool: the yellow arrow, It erases the last change done to the document, reverting it to an older state.
- Redo tool: the green arrow; it restores any actions that were previously undone using an undo.

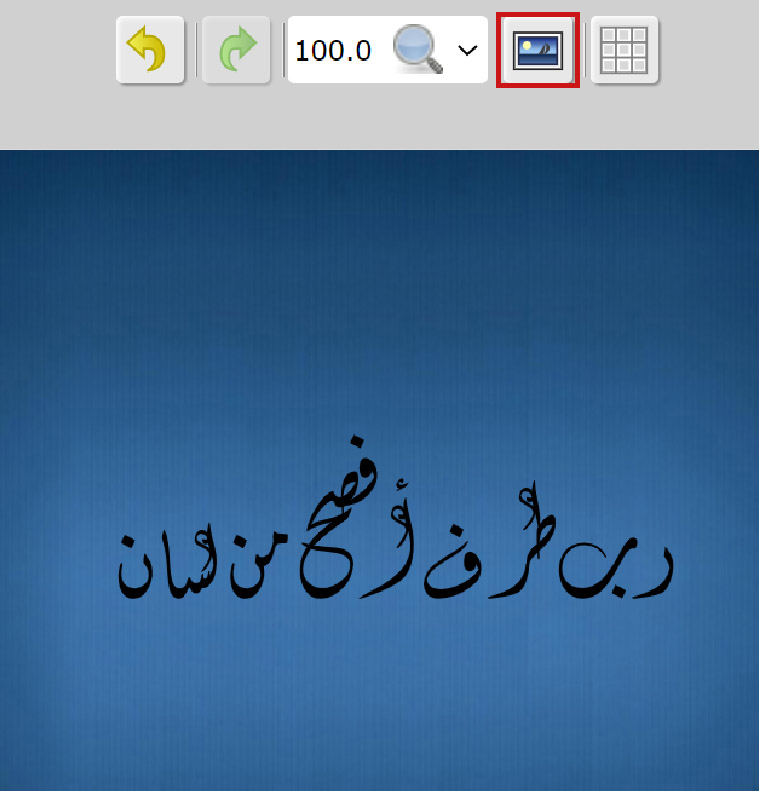
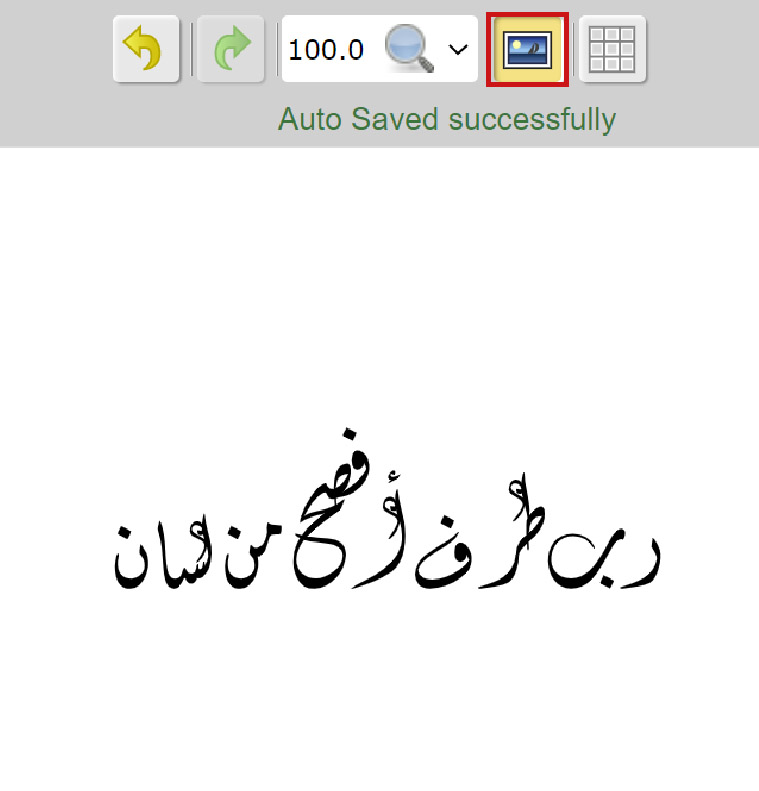
- Button show / Hide background:
If you need to deactivate the background to concentrate on your text design, you can just click on the button Show/Hide Background, then you can get back your background.
Including a background must be helpful when you intend to draw calligraphy following a mold (horse, pear,..) or to adjust your work on a complex graphic project which will be recalled in the background.
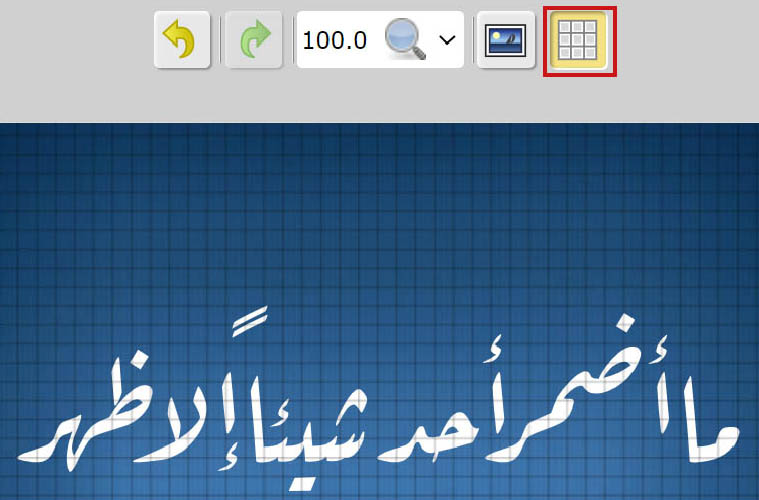
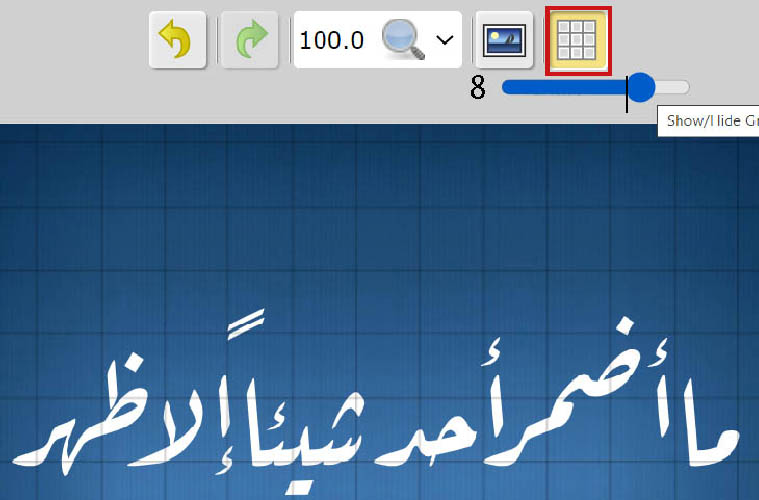
- Show/Hide Grid tool:
It allows you to align characters or assimilate them against others.
So your artwork must be harmonious!
You can control the size of the Grid using the scholar appearing below, when you hover the cursor over the button.
10. Saving and downloading
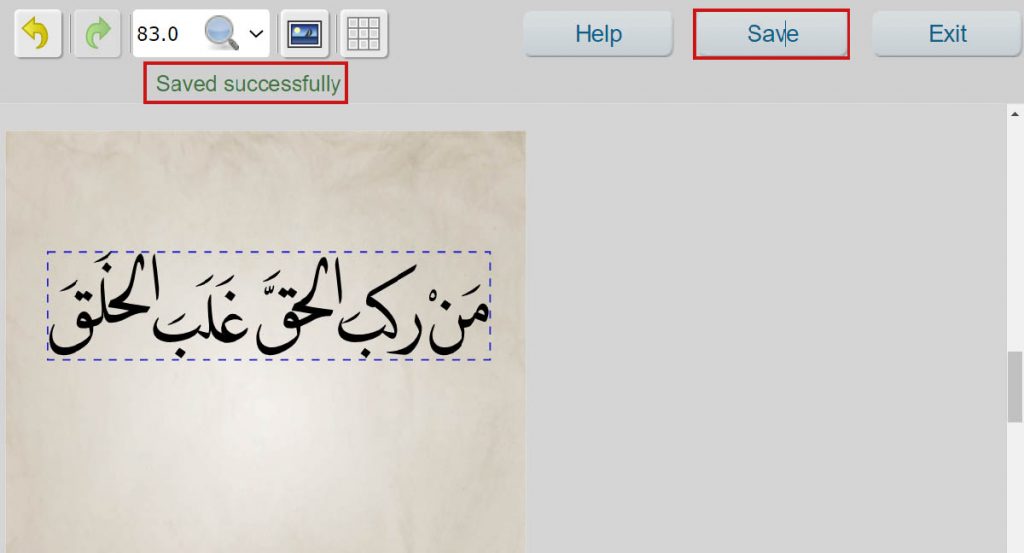
- Save button:
Every time you do a new action, the system does an auto save, but don’t forget to press the button save before leaving to avoid any surprises.
Even if you didn’t, next time you open your artwork, the last automatic saving will be proposed.
At this moment you can accept the unregistered modifications or pass over them.
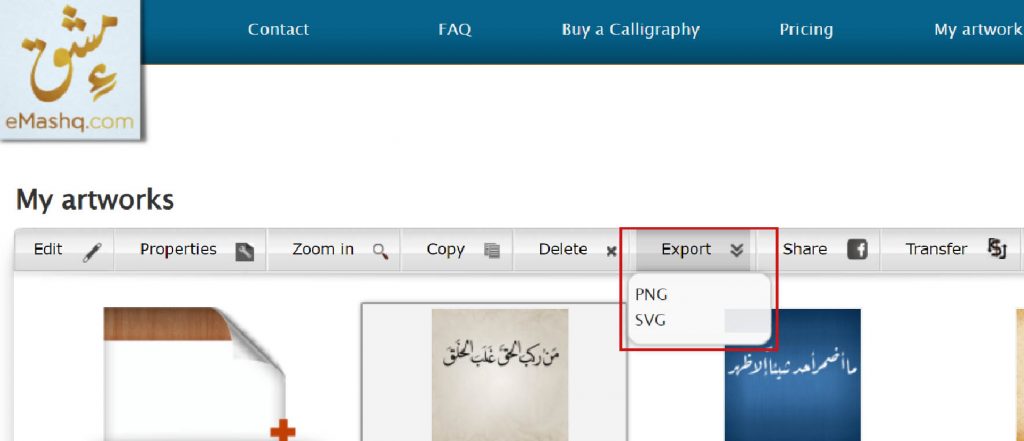
- Download your artwork:
In order to download your artwork, you must save, exit, than select your work and click on “export”.
Select the desired format, and There you go!
If you’re on a free registration you can only export to PNG format with a watermark.